By Merlin Carter
Let’s face it — Google’s developer documentation is dense. The information you need is usually all there, it’s just easy to get lost. We discovered this when trying to build a G Suite integration with the team at sennder — one of our portfolio companies.
So this is my attempt to give you a clearer path through Google’s documentation in case you need to do something similar. This guide is a companion to a follow-up article where I talk about the integration itself. The integration is designed to sync user accounts between two systems by using G Suite push notifications.
The Settings
Before we could start coding any kind of G Suite integration, we needed some setup work first. Here’s a summary of the steps that were required.
1. Giving the integration a Google Cloud project and Service Account
This was pretty straightforward, but I’ll be covering it anyway for the sake of consistency.
Each integration or “service” needed a service account to authenticate with the Google APIs.
2. Giving the integration access to sennder’s G Suite instance
The integration needs to read data from their G suite, so we needed to make sure that the service account had the appropriate permissions to read from G Suite. This was actually trickier than we expected.
3. Proving that we owned the target system that G Suit was supposed to notify
Or, more specifically, we needed to prove that we owned the domain of the “receiving address” i.e. the URL where G Suite sends notifications in the form of POST requests. This step was also a little complicated.
A note about images
I’ll be using screenshots to help you along the way because Google regularly changes its user interfaces (usually for the better). I want to make sure that you see what we saw when we set this up. This might save you some time going crazy searching for a menu item that’s no longer where I said it would be. Especially if you dig up this article many years later.
Creating a Google Cloud project and Service Account
We work with the Google APIs console fairly often, so this step is a matter of routine, but it’s worth mentioning anyway.
Creating a project
We needed a project to get all the necessary credentials for authenticating with the Google APIs.
In the Google API and Cloud consoles, you create a new project via the project selection menu.
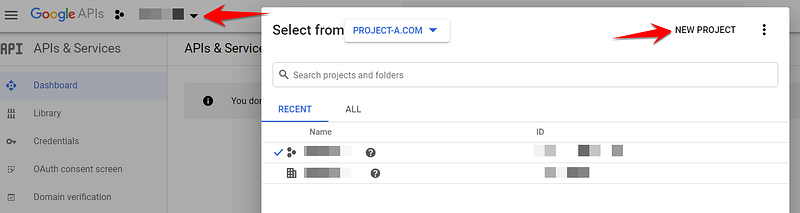
The rest should be straightforward, but if you run into trouble, there’s always the official Google documentation on working with projects.
Creating a Service Account:
Once we had our “gsuite-integration” project, we created a service account for our integration called “gs-integration-agent”.
The integration needs credentials to authenticate with the G Suite admin API, and a service account is one of the three types of credentials that you can create in the credentials section.
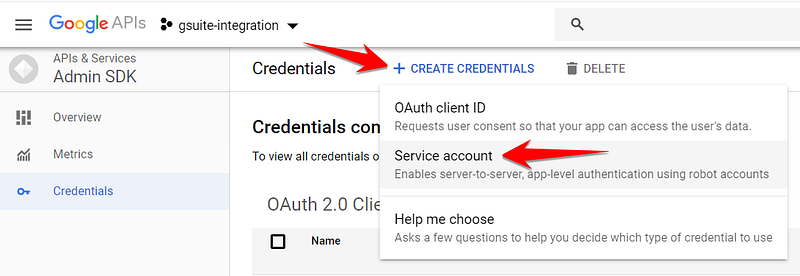
When we were in the wizard for creating a service account, we generated a credentials file by clicking “Create Key” and choosing the JSON format.
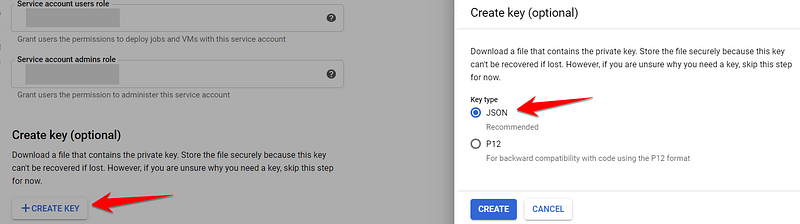
We downloaded the file and made a note of its location. We needed it later when we started coding the integration.
Again, if you need more information, there’s always Google’s official doc on creating service accounts.
Giving the integration access to the G Suite instance
This process consists of two steps where we need to pay very close attention to the documentation.
- In the Google APIs Console, we selected a special setting called “Enable GSuite domain-wide delegation” for the service account.
- In the G Suite Admin Console, we defined the “access scopes” for the service account “client”.
Enable GSuite domain-wide delegation
The “Domain-wide delegation” setting allows an app to access data for all G Suite users. The app can also make changes on behalf of all users. It’s a very powerful setting that is supposed to simplify G Suite permissions for service accounts. But we didn’t notice it at first.
⚠️ Google doesn’t want you enabling this setting by accident
- The name “domain-wide delegation” sounds pretty cryptic, so it wasn’t immediately obvious that we needed it.
Plus, this setting doesn’t show up in the wizard for creating a service account. - We only noticed the setting when we went back and edited the service account afterward — and even then, it was hidden in a weird collapsible panel.
So we overlooked it until we re-read the documentation.
After we realized that our service account was missing this setting, we went back and edited the service account.

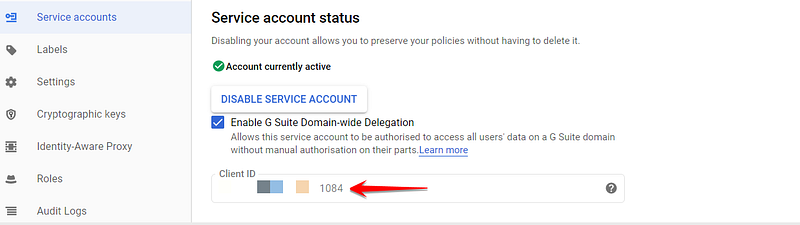
We expanded the SHOW DOMAIN-WIDE DELEGATION section, selected the “Enable G Suite Domain-wide Delegation” checkbox, and saved the changes.

After saving, we were taken back to the Credentials page, but we weren’t done yet. We needed to open the service account page again to confirm that our service account now had a “client ID”.
Give the service account “client” access to GSuite
This is why we needed to know the client ID. But we found the terminology a little confusing. What client are we talking about here? As it turns out, when you select the “Enable G Suite domain-wide delegation” option, Google creates a “service account client” for you. It has the same ID as the service account itself, but apparently, the service “account” and the service “client” are two different concepts. ¯_(ツ)_/¯
Anyway, we just knew that we needed it for the next part, as explained in the official doc.
The next part required going into the G Suite admin panel — however, most developers didn’t have a login to the G Suite admin console. We asked a sennder staff member with admin access to update these settings instead (you might have to do this too unless you’re also the sysadmin for your organization).
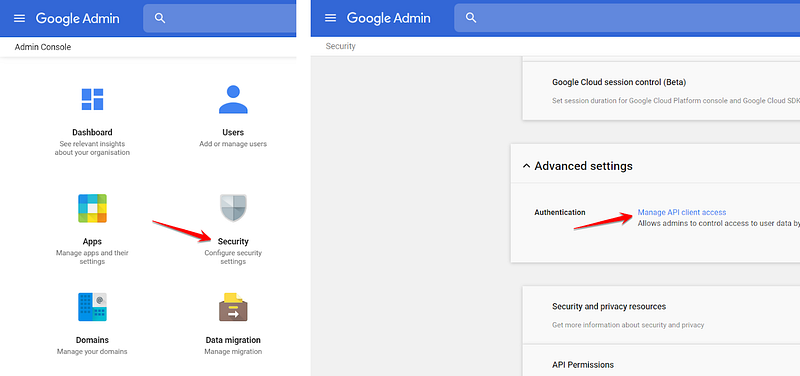
On the “Manage API client access” page, we asked the admin user to enter the Client ID of our service account and the API Scope as follows:
https://www.googleapis.com/auth/admin.directory.user.readonly
Code language: JavaScript (javascript)
This lets the service account pull data about each GSuite user — we didn’t need read permissions because we didn’t want to update any user data — just get the notifications.
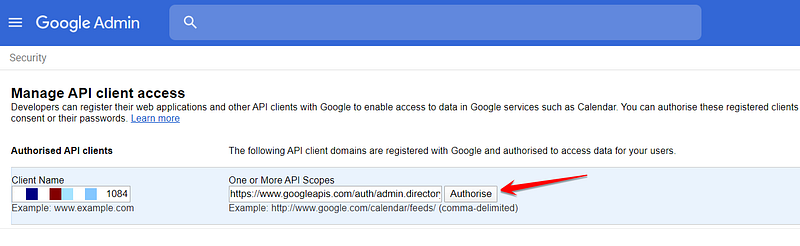
⚠️ “Client Name” actually means “Client ID”
- The label for the first field is a bit of a misnomer — “Client Name” is actually where you enter the client ID from the previous step.
Proving that we owned the target system
The target system is the system that receives and acts upon the notifications from G Suite. In our case, the target system was hosted under the domain “sennder.com”. Google wants to make sure that we actually own the domain “sennder.com” — they don’t want us bombarding some other website with notifications (for example, sender.net, a completely unrelated email app).
To prove ownership, you must update settings in two completely different Google products:
- In the Google Google Search Console, you must add your domain as a “property” and verify it.
- In the Google APIs Console, you must add the domain again to “double verify it,” I guess.
⚠️ It’s hard to test locally when you need a verified domain
- The problem was we didn’t technically own the domain “sennder.com” — we were helping Sennder, but we weren’t employees and had no way to administer the domain.
- In the Google Search Console, you’re supposed to use one of the standard site verification methods.
- But Google won’t let you receive notifications on “localhost” — and anyway, the receiving URL has to be an HTTPS address that has a “real” (i.e. not self-signed) certificate. Arrgh! How to test? Thank goodness for ngrok.
Use an HTTPS Tunnel to verify a temporary domain
A popular solution is to have an HTTPS tunnel to your localhost. Once you sign up and download the client, you can get started. You can use ngrok to tunnel your localhost to a secure address that Google will accept as a valid destination for push notifications and one that is easy to verify using Google’s suggested methods.
We had a local Django server running on port 8000, so we just entered the following command:
$ ./ngrok http
We then opened the ngrok admin dashboard on http://localhost:4040 and grabbed the HTTPS subdomain that ngrok automatically generated for us.
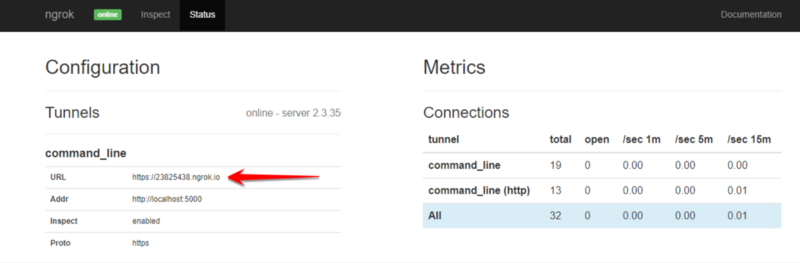
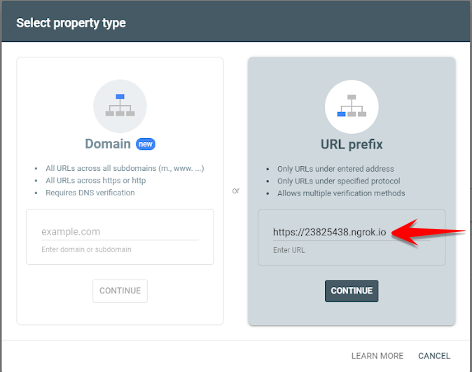
As you can see in the illustrated example, the testing URL was https://23825438.ngrok.io. We were then ready to verify our domain in the Google Search Console.
Verifying test domain in the Google Search Console
From the home page of the search console, click +Add Property.
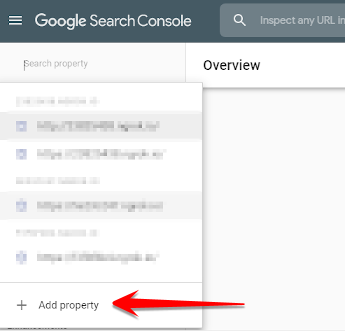
In the following dialog, we entered the test URL.
Once you click continue, Google will ask you to download an HTML file to verify the domain. Download it to the root directory of your web server and click “Verify”.
Hopefully, the verification worked, and you can now add the domain as an “allowed domain” for webhook notifications.
Adding the verified test domain in the Google APIs Console
Now, we needed to head back over to the google developer console and go to the Domain verification page.
We had to click Add Domain, and in the window that appeared, we added the domain of the webserver that will receive the notifications.
⚠️ Leave out the HTTPS
- When you add the domain, make sure you remove the HTTPS from the beginning of the URL. Some people reported problems getting verification to work when the entry included “HTTPS”.

Ready to receive push notifications
Phew — we were finally done preparing our environment. It doesn’t too complicated, and all the information you need is technically in the official documentation. However, as I said in the intro, it’s very easy to overlook the finer details given the sheer volume of reference material. Hopefully, I’ve made it a bit easier for any of you looking to start a similar project.
If you’ve been following along, check out my companion article, “How to sync user accounts with G Suite push notifications”.