By Merlin Carter
Co-authored with Zoltan Kincses, Senior Developer at Project A
Just over a year ago, we published a tutorial titled “ Serializing data in PHP: A simple primer on the JMS Serializer and FoS Rest”. We heard from a few people who found it helpful, so we decided to publish a follow-up.
Both this follow-up and the previous tutorial are aimed at developers who are new to PHP or building APIs in general. We created it to help our own junior developers, and we want to share it with you too.
This time, we’ll be focusing on interacting with a database rather than just serializing data. You don’t need to have read the previous tutorial to follow this one, but we will be glossing over some steps that are explained in more detail there.
Here’s a brief recap of what we did in the previous tutorial:
- We created a REST endpoint that accepted the basic properties of a postal address as a JSON payload.
- We then used the JMS serializer to serialize the address details into an object and then deserialize the object back into a different format (XML).
This time around, we’re going to add the following steps:
- We’ll write a POST operation to insert the serialized object into a database and give it a unique ID (UUID).
- We’ll add GET and DELETE operations to retrieve and remove specific database entries based on their UUIDs.
Here are all the major steps we’ll be covering:
- Bootstrap a skeleton project with the Symfony CLI.
- Install the required dependencies.
- Set up a MySQL database.
- Create an Address Entity that includes a UUID.
- Run Migrations to Create a Table for our Entity.
- Create a controller that handles write requests to the database.
- Update the controller to handle read and delete requests.
What you’ll need to start
You’ll need the same requisites as the previous tutorial, plus a MySQL database server.
Here’s a full list of all the prerequisites again:
- An IDE for editing PHP files
— You can use whatever you like, but to get started quickly, I recommend setting up a trial account with Codeanywhere. They have a PHP container template with PHP, Composer, MySQL, phpMyAdmin, and many other dependencies preinstalled.
— If you’re using something else, make sure that you have PHP 7.4.16+* and Composer for installing bundles.
* Naturally, PHP 8.1 is now out with many new features, but since we started this series on 7.x, we’re using 7.4 to be consistent. Version 7.4.16 is also the default version that comes preinstalled on the Codeanywhere PHP container. - The Symfony CLI
— Just like last time, we’ll use the Symfony CLI to bootstrap our project. After you’ve installed it, runsymfony check:requirementsto make sure all the required PHP dependencies are installed. - A REST API Client
—You’ll need some kind of client to make API requests. In this walkthrough, we’re just going to use plain old cURL (which comes preinstalled on Codeanywhere), but you can also use a UI-based client such as Postman. - MySQL server
— If you using Codeanywhere, this is already installed, but if you’re following along on a local IDE, you’ll need to install it yourself (Digital Ocean has some decent installation instructions for Ubuntu).
We’ll also be using some specific PHP bundles, but we’ll show you how to install those in the tutorial.
It also helps to have a basic knowledge of object-oriented programming in PHP.
Ok, let’s go!
Setting Up
Let’s bootstrap a new Symfony project and install all the extra bundles we need.
Create an empty PHP Skeleton Project
Use Symfony CLI to create a Symfony skeleton project called jms-db-tutorial (or whatever else you want to call it).
Enter the following command:
$ symfony new jms-db-tutorial
Code language: JavaScript (javascript)
It’s going to create the folder structure and initial files that you need for this tutorial.
Install the extra PHP Bundles
- First, if you haven’t already, install the JMS serializer:
composer require jms/serializer-bundle
Code language: JavaScript (javascript)- Install the dependencies that we used in the last tutorial.
composer require --dev symfony/maker-bundle
composer require friendsofsymfony/rest-bundle
composer require sensio/framework-extra-bundle
Code language: JavaScript (javascript)- Update the FOS Rest config file:
./config/packages/fos_rest.yaml
Make sure that it resembles the following example:
fos_rest:
    body_converter:
        enabled: true
    allowed_methods_listener:  true
    format_listener:
        rules:
            - { path: '^/', prefer_extension: true, fallback_format: json, priorities: [ 'json', 'xml'] }
Code language: CSS (css)- Install Symfony’s Doctrine ORM pack and the Doctrine-compatible UUID library from Ben Ramsey.
composer require symfony/orm-pack ramsey/uuid-doctrine
Code language: JavaScript (javascript)- Update the configuration for Doctrine’s Database Abstraction Layer (DBAL) and add UUID as a field type.
Open the following file: ./config/packages/doctrine.yaml
In the dbal section, add the following lines:
types:
   uuid: Ramsey\Uuid\Doctrine\UuidType
Your updated configuration file should look like this:
doctrine:
    dbal:
        url: '%env(resolve:DATABASE_URL)%'
        # IMPORTANT: You MUST configure your server version,
        # either here or in the DATABASE_URL env var (see .env file)
        #server_version: '13'
        types:
            uuid: Ramsey\Uuid\Doctrine\UuidType
    orm:
...
Code language: PHP (php)
Now you’re ready to set up your database.
Preparing the Database
For the sake of simplicity, we’ll be using the root user for our database transactions. Of course, in a production scenario, you should never use root. Always create and configure a dedicated database user for your application.
However, even when using root we need to ensure that the root user has a password.
Depending on how you installed MySQL, your root user might not have a password initially. For example, if you’re using Codeanywhere, the root user doesn’t have a password by default.
So, if this applies to you, first…
Set the root user password
To give your root user a password, follow these steps:
- Start a MySQL shell:
mysql -u root - Execute the command:
SET PASSWORD FOR 'root'@'localhost' = PASSWORD('YourNewPassword');
Code language: JavaScript (javascript)- Exit the shell and log in again with your password:
mysql -u root -p(You’ll get a password prompt after you hit Enter)
Create a Database
We’re creating an address entity that is usually attached to a customer record of some sort. So let’s call our database ‘customer’.
In the MySQL shell, execute the following command:
mysql> CREATE DATABASE customer;
Configure the Database Connection
Once your database is set up, configure your Symfony application to connect to your database.
To configure the database connection, follow these steps:
- Open the
.envfile at the root of your project:
The default database connection string is usually for a Postgres Database, but we want to switch it to MySQL. - Find the line that begins with
DATABASE_URL="postgresql:and comment it out with ‘#’ (if it’s not already). - Find the line that begins with
DATABASE_URL="mysql:, uncomment it, and update the placeholder values (db_user,db_password, anddb_name) withroot, your MySQL root user password, andcustomerrespectively. - Save your changes.
Your .env should now resemble the following example:
...
###> doctrine/doctrine-bundle ###
# Format described at https://www.doctrine-project.org/projects/doctrine-dbal/en/latest/reference/configuration.html#connecting-using-a-url
# IMPORTANT: You MUST configure your server version, either here or in config/packages/doctrine.yaml
#
# DATABASE_URL="sqlite:///%kernel.project_dir%/var/data.db"
DATABASE_URL="mysql://root:[email protected]:3306/customer?serverVersion=5.7"
# DATABASE_URL="postgresql://symfony:[email protected]:5432/app?serverVersion=13&charset=utf8"
###< doctrine/doctrine-bundle ###
...
Code language: PHP (php)
Creating the Address Entity
If you followed the previous tutorial, you might remember creating an address entity already, but let’s do it again from scratch.
This time, we’re going to use the maker bundle, which is more efficient.
To create the Address entity, follow these steps:
- Open a terminal window in the root of your project and enter the following command:
bin/console make:entityYou’ll be prompted to give it a name and define some properties. - Call it
Addressand define the same properties that we had in the last tutorial, which were:
— name
— line1
— line2
— line3
— city
— postcode
— country - For simplicity’s sake, accept the defaults for the field attributes by pressing
ENTER… with one exception:
Let’s make it so that “line3” can be NULL (many addresses don’t have enough details to warrant a third line). - When you get to “line3”, override the default suggestion and answer ‘yes’ to “can this field be null?”.
Let’s take a look at what was automatically generated for us. Open the new entity file ./src/Entity/Address.php
The first part of the file should resemble the following example:
<?php
namespace App\Entity;
use App\Repository\AddressRepository;
use Doctrine\ORM\Mapping as ORM;
/**
 * @ORM\Entity(repositoryClass=AddressRepository::class)
 */
class TestAddress
{
    /**
     * @ORM\Id
     * @ORM\GeneratedValue
     * @ORM\Column(type="integer")
     */
    private $id;
    /**
     * @ORM\Column(type="string", length=255)
     */
    private $name;
    ...
Code language: HTML, XML (xml)
This is a good start, but we need to make a lot of changes to this entity. The first thing we need to do is import the required bundles.
Import the UUID and JMS Serializer bundles
Under the existing imports, add the following lines:
use Ramsey\Uuid\Doctrine\UuidGenerator;
use JMS\Serializer\Annotation as Serializer;
Code language: PHP (php)
The first bundle is for UUID generation. We’re using the UUD bundle from Ben Ramsey because it’s well-documented, and you can also use it independently of Symfony. The second bundle is our trusty JMS serializer to handle the incoming data. As in the last tutorial, we’ll need to add annotations to configure the serializer, but first…
A short note about the Repository Class Argument
By default, Symfony creates an Entity that’s annotated with a specific Repository class like so:
@ORM\Entity(repositoryClass=AddressRepository::class)
Code language: JavaScript (javascript)
However, in this basic tutorial, we’re not going to use repository objects. In a production scenario, the official Symfony documentation encourages you to register repositories this way, but it’s also valid to omit this argument (so that the entity is not dependent on a specific repository). You can find a full explanation in the article “How to use Repository with Doctrine as Service in Symfony”.
Add the JMS exclusion policy.
If you remember from the last tutorial, we want the JMS serializer to ignore all properties except the ones in our Entity. So we exclude everything by default and then expose the permitted properties explicitly.
To exclude everything by default, add the annotation @Serializer\ExclusionPolicy("all")underneath the @ORM\Entity()annotation:
The first part of your Address class should now look like this:
/**
 * @ORM\Entity()
 * @Serializer\ExclusionPolicy("all")
 */
class Address
Code language: PHP (php)
Update the ID to be a UUID instead of an integer
You can see that the maker bundle has automatically created an $id property as well as the properties we explicitly defined in the wizard.
You can see that it’s configured to generate simple integers for the entry IDs:
/**
 * @ORM\Id
 * @ORM\GeneratedValue
 * @ORM\Column(type="integer")
 */
 private $id;
Code language: PHP (php)
Every entry in a database needs some kind of ID, but incremental IDs are very easy to guess. We want to make sure that mischievous actors can’t access our database entries by trying out different numbers.
Instead, we want to reconfigure the $id property so that a true UUID is generated for every new database entry (such as ‘ebb5c735–0308–4e3c-9aea-8a270aebfe15’).
To do so, update the annotation block with the following changes:
/**
 * @var Ramsey\Uuid\UuidInterface
 *
 * @ORM\Id
 * @ORM\Column(type="uuid", unique=true)
 * @ORM\GeneratedValue(strategy="CUSTOM")
 * @ORM\CustomIdGenerator(class=UuidGenerator::class)
 */
Code language: PHP (php)
What have we done exactly?
- The
@vartag provides a hint to your IDE about the property type, which can be useful for auto-completion. In this case, the type is “Uuid” based on the Ramsey UUID interface. - We’re also changing the database column type from an integer to a UUID (with
type="uuid", unique=true) - We’re indicating that we’re using a custom method (
ramsey/uuid) to generate the ID (strategy="CUSTOM")). - Then, we’re defining the custom UUID generator that we want to use:
@ORM\CustomIdGenerator(class=UuidGenerator::class)
Expose properties to override JMS serializer exclusion policy
We need to expose our Address properties for serialization (like we did in the previous tutorial).
For each of the remaining Address properties (starting with “name), update the annotation block to include the relevant JMS serializer annotations.
Here’s an example of how the annotations should look for the name property:
/**
 *
 * @var string|null
 *
 * @ORM\Column(type="string", length=255)
 * @Serializer\Expose)
 * @Serializer\Type("string")
 * @Serializer\SerializedName("name")
 */
 private $name;
Code language: PHP (php)
To recap, here’s how your Address entity should look after you’ve completed all the required changes:
<?php
namespace App\Entity;
use App\Repository\AddressOrmRepository;
use Doctrine\ORM\Mapping as ORM;
use Ramsey\Uuid\Doctrine\UuidGenerator;
use JMS\Serializer\Annotation as Serializer;
/**
 * @ORM\Entity()
 * @Serializer\ExclusionPolicy("all")
 */
class Address
{
    /**
     * @var \Ramsey\Uuid\UuidInterface
     *
     * @ORM\Id
     * @ORM\Column(type="uuid", unique=true)
     * @ORM\GeneratedValue(strategy="CUSTOM")
     * @ORM\CustomIdGenerator(class=UuidGenerator::class)
     */
    private $id;
    /**
     * @var string|null
     *
     * @ORM\Column(type="string", length=255)
     * @Serializer\Expose()
     * @Serializer\Type("string")
     * @Serializer\SerializedName("name")
     */
    private $name;
    ...
Code language: HTML, XML (xml)
Creating and Executing the Database Migrations
Congratulations! You’re now ready to create a database migration for your address Entity. Migrations allow you to incrementally change your data structures in a way that’s easy to roll back.
To create migration for your Entity, run the following command at the root of your project:
bin/console make:migration
Code language: JavaScript (javascript)
Assuming everything worked, you’ll find the result of the migration in the ./migrations folder. It will be called something like “Version20211222122815.php”
Let’s take a quick look inside:
<?php
...
final class Version20211222122815 extends AbstractMigration
{
    public function getDescription(): string
    {
        return '';
    }
    public function up(Schema $schema): void
    {
        // this up() migration is auto-generated, please modify it to your needs
        $this->addSql('CREATE TABLE address (id CHAR(36) NOT NULL COMMENT \'(DC2Type:uuid)\', name VARCHAR(255) NOT NULL, PRIMARY KEY(id)) DEFAULT CHARACTER SET utf8mb4 COLLATE `utf8mb4_unicode_ci` ENGINE = InnoDB');
    }
    public function down(Schema $schema): void
    {
        // this down() migration is auto-generated, please modify it to your needs
        $this->addSql('DROP TABLE address');
    }
}
Code language: HTML, XML (xml)
It contains simple SQL commands to run on the customer database. It will create an “address” table and add columns for each of the properties in the entity.
Note the columns that have special configurations, such as the “Id” column and the “Line3” column. The “Line3” is the only column to have “NULL” as its default — the others are not allowed to be NULL.
Assuming everything looks fine, it’s time to execute the migrations on the database.
To do so, run the command:
bin/console doctrine:migrations:migrate
Code language: JavaScript (javascript)
The SQL commands are run, and the “address” table is created in our “customer” database.
To verify this, let’s query our database. Start a MySQL shell with mysql -u root -p and run the following commands:
mysql> USE customer
mysql> SHOW TABLES;
Code language: PHP (php)
You should see a new address table.

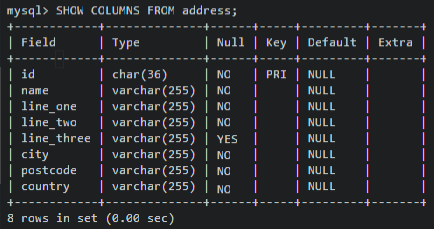
Now, let’s look at the columns by running
mysql> SHOW COLUMNS FROM address
You should see that the id column is the primary key and that Line3is the only column that’s allowed to be NULL:
Now it’s time to set up our API endpoint, which will write data to this table.
Create an Address Controller
To create an address controller, we use the same command from the previous tutorial:
bin/console make:controller
Code language: JavaScript (javascript)
When prompted, call it “Address”.
As before, we get some boilerplate code that we’ll need to change:
<?php
namespace App\Controller;
use Symfony\Bundle\FrameworkBundle\Controller\AbstractController;
use Symfony\Component\HttpFoundation\Response;
use Symfony\Component\Routing\Annotation\Route;
class AddressController extends AbstractController
{
    /**
     * @Route("/address", name="Address")
     */
    public function index(): Response
    {
        return $this->json([
            'message' => 'Welcome to your new controller!',
            'path' => 'src/Controller/AddressController.php',
        ]);
    }
}
Code language: HTML, XML (xml)
Add the required imports
First, import the address entity that we created previously
use App\Entity\Address;
Code language: PHP (php)
Next, import all the extra bundles that we used in the previous tutorial, as well as the Doctrine Entity Manager Interface, which is a new addition.
use Doctrine\ORM\EntityManagerInterface;
use Symfony\Component\Routing\Annotation\Route;
use Sensio\Bundle\FrameworkExtraBundle\Configuration\ParamConverter;
use FOS\RestBundle\Controller\AbstractFOSRestController;
Code language: PHP (php)
Update the Base Class
Just like in the first tutorial, change the base class from AbstractController to AbstractFOSRestController— we want to use the extra features that come with the FOSRest bundle.
The class definition should now look like this:
class AddressController extends AbstractFOSRestController
Code language: JavaScript (javascript)
Add a property to the Entity Manager Interfaces
We want to use the Entity Manager interface to write our data to the database. This time around, we’ll add it using the typed properties that were introduced in PHP 7.4.
Inside the AdressControllerclass, assign the Entity Manager interface to a property like so:
class AddressController extends AbstractFOSRestController
{
    private EntityManagerInterface $em;
Code language: PHP (php)
Underneath the property definition, add the property to a constructor like so:
public function __construct(EntityManagerInterface $em)
 {
      $this->em = $em;
 }
Code language: PHP (php)
The first part of your controller should now look like this:
<?php
namespace App\Controller;
use App\Entity\Address;
use Doctrine\ORM\EntityManagerInterface;
use Symfony\Component\HttpFoundation\Response;
use Symfony\Component\Routing\Annotation\Route;
use Sensio\Bundle\FrameworkExtraBundle\Configuration\ParamConverter;
use FOS\RestBundle\Controller\AbstractFOSRestController;
class AddressController extends AbstractFOSRestController
{
    private EntityManagerInterface $em;
    public function __construct(EntityManagerInterface $em)
    {
        $this->em = $em;
    }
...
Code language: HTML, XML (xml)
Create a POST endpoint
Now it’s time to define an endpoint to receive our data. Replace the boilerplate indexfunction with an empty postAdressfunction.
/**
 * @Route("/address", methods={"POST"})
 * @ParamConverter("address", converter="fos_rest.request_body")
 */
public function postAddress(Address $address): Response
 {
     // properties go here
 }
Code language: PHP (php)
Inside the empty function, add the following properties
$this->em->persist($address);
$this->em->flush();
Code language: PHP (php)- The
persistcall instructs the Entity Manager to track this change in memory. - The
flushcall tells the Entity Manager to actually execute this change on the database.
Next, we add the FOSRest handleView method from the previous tutorial:
return $this->handleView($this->view($address));
Code language: PHP (php)
This demonstrates how to serialize the data into another format, such as XML. Our POST request will respond with this serialized version of the JSON payload.
Your PostAddress action should now look like this:
<?php
...
    /**
     * @Route("/address", methods={"POST"})
     * @ParamConverter("address", converter="fos_rest.request_body")
     */
    public function postAddress(Address $address): Response
    {
        // Normally, you would validate the data before persisting it.
        // For simplicity, we have left this step out.

        $this->em->persist($address);
        $this->em->flush();

        return $this->handleView($this->view($address));
    }
...
Code language: HTML, XML (xml)
As we’ve noted in the code, you should add validation when using something like this in production. Symfony’s built-in Validator Service helps you verify data constraints that are defined in an entity class.
Test the endpoint
OK, now it’s time to see if it works. First off, start the Symfony server by running the following command in the project root:
symfony serve --no-tls
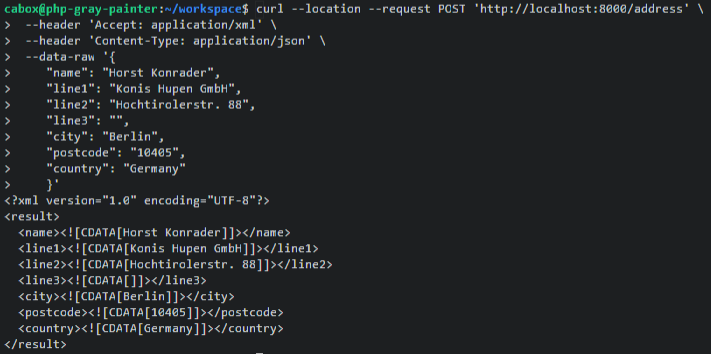
In a new terminal window, enter the following cURL command:
curl --location --request POST 'http://localhost:8000/address' \
 --header 'Accept: application/xml' \
 --header 'Content-Type: application/json' \
 --data-raw '{
    "name": "Horst Konrader",
    "line1": "Konis Hupen GmbH",
    "line2": "Hochtirolerstr. 88",
    "line3": "",
    "city": "Berlin",
    "postcode": "10405",
    "country": "Germany"
}'
Code language: PHP (php)
Note that the “line3” property has been left empty on purpose. We want to make sure that the database will accept a NULL value in the equivalent column.
You should get the same data serialized back as XML.
This time, we want to verify that the data was also written to the database.
Log into a MySQL shell using the command mysql -u root -p and run the following commands:
mysql> USE customerdb
mysql> SELECT * from address;
Code language: PHP (php)
You should now see that our entry for “Horst Konrader” has made it into the database, complete with UUID.

Now we can use that UUID to retrieve the details for the entry from the database. Make a note of the UUD for the next step.
Create a GET endpoint
Let’s create a new endpoint that accepts a UUID and returns the entry details as XML (with our handleViewmethod).
To create the GET endpoint, follow these steps:
1. Make a copy of the POST function underneath the existing one and remove the existing properties inside it.
2. Change the @Routeannotation as follows:
* @Route("/address/{id}", methods={"GET"})
Code language: JavaScript (javascript)
3. Remove the @ParamConverterannotation (since we’re not sending a payload, we have nothing to convert).
4. Change the function name togetAddressand change the function argument from Address $addressto string $id.
This time, we want to work with the UUID, which is passed a path segment parameter (rather than the Address payload).
5. Let’s add some error handling in case the UUID doesn’t exist in the database — add the following block inside the function:
$address = $this->em->find(Address::class, $id);

if (empty($address)) {
            throw $this->createNotFoundException('The address does not exist');
        }
Code language: PHP (php)
The createNotFoundException method is a Symfony shortcut that returns a 404 status code and an error page when the UUID isn’t found in the database.
6. If the entry does exist, we want to serialize it into XML and return it as a response — to do so, add the following line.
return $this->handleView($this->view($address));
Code language: PHP (php)
The full getAddressaction should look like this:
<?php
...
    /**
     * @Route("/address/{id}", methods={"GET"})
     */
    public function getAddress(string $id): Response
    {
        $address = $this->em->find(Address::class, $id);

        if (empty($address)) {
            throw $this->createNotFoundException('The address does not exist');
        }
        return $this->handleView($this->view($address));
    }
...
Code language: HTML, XML (xml)
Now let’s try it out.
Send a GET request with the following command but replace the UUID with the one you noted from the previous section.
curl --location --request GET 'http://localhost:8000/address/81b6827f-33c6-473c-8cb7-cf13c30ac94d' \
 --header 'Accept: application/xml'
Code language: JavaScript (javascript)
You should get the same XML details back as your response.
<?xml version="1.0" encoding="UTF-8"?>
<result>
 <name><![CDATA[Horst Konrader]]></name>
 <line1><![CDATA[Konis Hupen GmbH]]></line1>
 <line2><![CDATA[Hochtirolerstr. 88]]></line2>
 <line3><![CDATA[]]></line3>
 <city><![CDATA[Berlin]]></city>
 <postcode><![CDATA[10405]]></postcode>
 <country><![CDATA[Germany]]></country>
</result>
Code language: HTML, XML (xml)
Create a DELETE endpoint
Finally, let’s remove the entry with a DELETE endpoint.
To create the DELETE endpoint, follow these steps:
- Make a copy of the GET function underneath the existing one.
- Change the
@Routeannotation as follows:
* @Route("/address/{id}", methods={"DELETE"})
Code language: JavaScript (javascript)- Change the function name to
deleteAddress.
We still need the same error handling that we had for the GET request, so keep that section.
- Underneath the error handling block, add the following lines:
$this->em->remove($address);
$this->em->flush();
Code language: PHP (php)- Again, the
removecall instructs the Entity Manager to track the removal in memory. - The
flushcall tells the Entity Manager to actually execute the remove operation on the database and delete the entry.
- Lastly, we want to return a simple status code if the operation is completed successfully — to do so, add the following line:
return new Response(null, 200);
Code language: JavaScript (javascript)
Your deleteAddress action should now look like this:
<?php
...
    /**
     * @Route("/address/{id}", methods={"DELETE"})
     */
    public function deleteAddress(string $id): Response
    {
        $address = $this->em->find($id, Address::class);

        if (empty($address)) {
            throw $this->createNotFoundException('The address does not exist');
        }
        $this->em->remove($address);
        $this->em->flush();
        return new Response(null, 200);
    }
...
Code language: HTML, XML (xml)
OK, you know the drill. Let’s test it by running a request with the following command:
(As before, replace the sample UUID with the one you noted previously)
curl --location --request DELETE 'http://localhost:8000/address/81b6827f-33c6-473c-8cb7-cf13c30ac94d'
Code language: JavaScript (javascript)
To make sure that it worked, let’s query our database again. Start a MySQL shell with mysql -u root -p and run the following commands:
mysql> USE customer
mysql> SELECT * from address;
Code language: PHP (php)
The entry with the noted UUID should hopefully be gone.
Wrapping Up
Congratulations on making it this far! If you want to see the entire Address Entity and Controller, take a look at the gists linked below:
To see what else you can do with databases (such as updating or listing entries), check out the Symfony documentation on Databases and the Doctrine ORM.
In tutorials like these, we try to fill in any documentation gaps that we found to be lacking on our own journeys to PHP mastery. And we hope this simple primer helped to bring you a little bit closer to creating a full-fledged PHP application yourself.
If you feel like you’re ready to build this example out even further, try mastering validation and implementing JWT Authentication.
And as always, if there’s anything else you think isn’t documented very well and could use a decent write-up, let us know!