By Merlin Carter
Recently, we started a new project and decided it was a good time to try GitHub’s newish CI/CD tools, which became generally available in November last year.
Our experience with GitHub actions has been mostly positive, so I thought I’d share how we use it in production.
This article is the first part of two — one article for each workflow.
- Integration: test an application on every push and publish the application image to a container registry.
- Deployment: repeat the integration steps but also validate the release tag with a custom action and deploy the application image to a Kubernetes cluster.
So, let’s start with the continuous integration process:
Workflow Overview
Our continuous integration workflow has two jobs:
- Lint the code with Flake8 and test the application with Pytest.
- Build a Docker Image and publish it to Google’s container registry
Project Overview
These instructions will make more sense if you understand how our project is set up.
It’s a web app for a major property tech startup. It consists of four sub-applications that interact with each other as well as several external services.
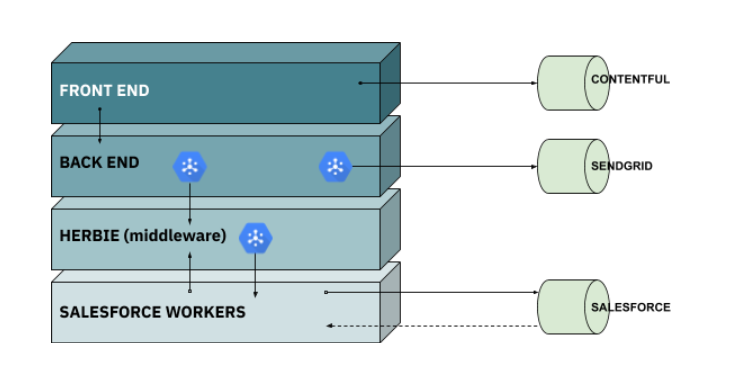
Aside from the front end, all apps need to interact with Google Pub/Sub message queues (which explains why we use a Google Pub/Sub emulator in our workflow).
For example, when someone changes customer contact details in the frontend, the following events are triggered:
- The backend database is immediately updated.
- In the background, a message is placed in the queue for the middleware — our own open-source project called “Herbie”.
- Herbie pulls the message from the queue and validates the message against a stored data schema (in this case, for the business entity “customer”).
- Herbie then transforms the message into a format that Salesforce can understand and puts it in a queue for the Salesforce push worker.
- The Salesforce push worker pulls the message from the queue and pushes the change to Salesforce.
That way, customer details are always up-to-date in both the Web app and Salesforce — which makes the salespeople happy.
In the following section, I’m going to describe how we set up CI for the backend app. However, the workflows for each app essentially follow the same structure.
To follow along, you first need to create a workflow file.
Create a workflow file
This is easy to do in GitHub’s user interface.

In your repository, go to the Actions tab and click New Workflow. In the following screen, click “set up a workflow yourself”. This creates a commented workflow file which we can then edit.
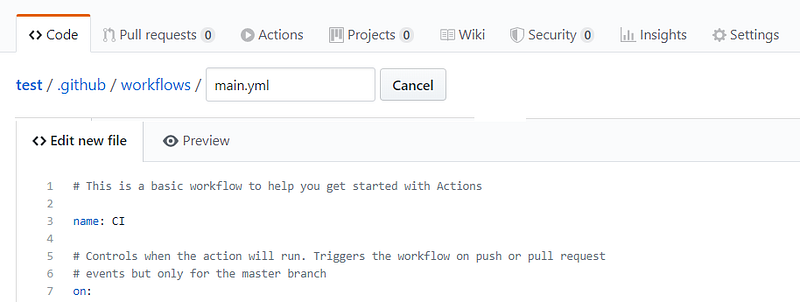
Define the triggering event
We wanted workflow to happen whenever someone pushed to any branch. So we updated our workflow file as follows.
name: CI
on:
  push:
    branches:
      - '**'
Code language: JavaScript (javascript)
Define the jobs
After each push, we wanted to test the app, take a snapshot of it, and archive it as a Docker image in our container registry (just in case we needed to roll back to an earlier iteration of the app).
For this purpose, we defined two jobs:
- Job 1: Run the tests
- Job 2: Build and publish the Docker image
If the first job fails, there’s no need to run the second job. We only want to archive working versions of the app.
Job #1: Run the tests
As mentioned, we want to lint the code with Flake8 and test the application with Pytest — but we need to set up the environment and install all the dependencies first.
Define the environment and service containers
To run our tests, we install most of the dependencies directly on the virtual machine.
But there are a few components that would be excessively complex to set up if we were to install them directly, such as:
- The database: The backend uses a PostgreSQL database.
- The Pub/Sub emulator: This is Google’s tool to emulate their Pub/Sub messaging service locally.
- Normally the backend would push to a queue running another app (Herbie), but we don’t need the real queue for testing.
- We just want to test that the back end interacts correctly with a queue.
For these components, we can Docker containers instead. We defined these as “Service Containers” with the following syntax:
jobs:
  tests: # Job ID
    name: Tests # Name of the job displayed on GitHub.
    runs-on: ubuntu-latest # OS for the GitHub-hosted virtual machine
    services: # Define Docker containers to use for this job.
      backend-db: # Container ID for our database container
        image: postgres:12.1 # Image to pull from Docker Hub
        env:
          POSTGRES_USER: user
          POSTGRES_PASSWORD: password
          POSTGRES_DB: backend_db
        ports:
        - 5432:5432 # TCP port to expose on Docker container and host environment
      backend-gcloud-pubsub: # Container ID for our Pub/Sub container
        image: 'knarz/pubsub-emulator' # Image to pull from Docker Hub
        ports:
          - '8085:8085' # TCP port to expose on Docker container and host environment
Code language: PHP (php)
When the workflow is triggered, GitHub pulls the following images from Docker Hub:
- The official Postgres image for the ‘backend-db’ container
- A Pub/Sub emulator image which is a containerized version of Google’s Pub/Sub emulator.
Define the steps and actions
Next, we start defining the steps in our job. Many of the steps use what GitHub calls “actions,” which are essentially small predefined scripts that execute one specific task. GitHub provides its own built-in actions, and there’s a marketplace for actions that other users have contributed. You can also build your own actions — I’ll describe how we did this in a companion article about our continuous deployment workflow.
But for this guide, we just use actions from the GitHub marketplace.
1) Check out the working branch and Set up SSH credentials
We need to check out our working branch on our virtual machine, but instead of running git checkout, we just use a built-in GitHub checkout action.
Next, we set up the ssh credentials on the virtual machine. In this step, we get the SSH key from a secret.
steps:
    - name: Checkout working branch
      uses: actions/checkout@v1

    - name: Setup ssh
      run: |
        mkdir ~/.ssh/
        echo "${{ secrets.SSH_PRIVATE_KEY }}" > ~/.ssh/id_rsa
        chmod 600 ~/.ssh/id_rsa
        touch ~/.ssh/known_hosts
        ssh-keyscan github.com >> ~/.ssh/known_hosts
Code language: JavaScript (javascript)
Secrets are environment variables that are encrypted and only exposed to selected actions. You create these secrets in the repository settings. In our case, we’re using the private key for our GitHub machine user.
We need an SSH key so that the machine user can authenticate with GitHub and clone some of our other private repositories to the virtual machine.
2) Set up Python and install the PostgreSQL client
Next, we use another built-in action to set up our required Python version. Then we install the PostgreSQL client. We have our database running in a docker container, but we need a client to access it.
- name: Set up Python 3.8
      uses: actions/setup-python@v1
      with:
        python-version: 3.8

   - name: Install PostgreSQL 11 client
      run: |
        sudo apt-get -yqq install libpq-dev
Code language: JavaScript (javascript)
3) Set up caching
We cache the dependencies that we have installed from previous runs so that we don’t have to keep installing them over again.
We set up caching using the built-in cache action.
It checks any file where dependencies are defined (such as Python’s “requirements.txt”) to see if it has been updated. If not, it loads the dependencies from the cache.
However, we don’t use “requirements.txt”. However, we don’t use “requirements.txt”. Instead, we use a tool called Poetry to manage Python dependencies. With this tool, you define your dependencies in a file called “pyproject.toml”, which we’ve committed to our repository. When you initialize or update a Poetry project, it automatically generates a “poetry.lock” file based on the contents of the .toml file.
So we configure the cache action to check for changes to our poetry.lock file instead. It does this by comparing the file hashes for the cached and incoming versions of the lock file.
- name: Cache Poetry
      uses: actions/cache@v1
      id: cache
      with:
        path: ~/.cache/pip
        key: ${{ runner.os }}-pip-${{ hashFiles('**/poetry.lock') }}
        restore-keys: |
          ${{ runner.os }}-pip-
Code language: JavaScript (javascript)
4) Install dependencies
Next, we upgrade pip and install Poetry.
Once Poetry is installed, we use it to install the dependencies listed in our poetry.lock file. These dependencies include the linting and testing tools which we’ll use in the following steps.
- name: Install dependencies, config poetry virtualenv
      run: |
        python -m pip install --upgrade pip
        pip install poetry
        poetry config virtualenvs.create false
        poetry install --no-interaction
Code language: JavaScript (javascript)
5) Lint the code
Next, we lint the Python code to make sure it adheres to our style guide. For this, we use the Flake8 Tool, which we run here.
- name: Lint with flake8
      run: |
        # stop the build if there are Python syntax errors or undefined names
        flake8 . --count --select=E9,F63,F7,F82 --show-source --statistics
        # exit-zero treats all errors as warnings. The GitHub editor is 127 chars wide
        flake8 . --count --exit-zero --max-complexity=10 --max-line-length=127 --statistics
Code language: PHP (php)
6) Run the tests
We’re going to test for any issues with the localizations, so we’ll need the GNU gettext utilities, which we install in a preparation step. In the main test step, we first compile the localization messages, then run our tests with Pytest.
We provide Pytest with a whole bunch of environment variables which mostly have dummy values. Not all of the variables are used in the tests, but they need to be present when building the app container that we’ll use for testing.
- name: Install gettext for translations
      run: |
        sudo apt-get update && sudo apt-get install -y gettext
   - name: Test with pytest
      run: |
        python manage.py compilemessages
        pytest --verbose
      env:
        CLUSTER_ENV: test
        RUN_DEV: 0
        POSTGRES_DB: backend_db
        POSTGRES_USER: user
        POSTGRES_PASSWORD: password
        POSTGRES_DB_PORT: 5432
        POSTGRES_DB_HOST: localhost
        SECRET_KEY: thisisasecret
        SENDGRID_API_KEY: 'test-key'
        PUBSUB_EMULATOR_HOST: localhost:8085
        GCLOUD_PUBSUB_PROJECT_ID: 'test-project'
        HERBIE_TOKEN: 'random-key'
        HERBIE_HOST: 'http://localhost:8000'
Code language: PHP (php)
OK, so that’s it for the tests. If you want to see the job in its entirety, check out this gist of our workflow file. If the tests all pass, we run the next job.
Job #2: Build the Docker image and publish it to a registry
Assuming the tests have passed, we build and archive our app image in a private container registry. In our case, it’s a Google Container Registry.
Define the run conditions
As with last time, we set the job ID “docker-image”, give it a name and define the host operating system.
We also specify that we need the previous job to have returned a success error code using the “needs” syntax.
docker-image:
      name: Build & Publish Docker Image
      needs: [tests]
      runs-on: ubuntu-latest
Code language: CSS (css)
Define the job steps
1) Check out the branch and set environment variables
The first step is the “check out branch” action which I described in the first job. We have to do this again because data is not persisted from job to job (unless you explicitly configure “job artifacts”).
After the checkout step, we define specific environment variables:
- The Google Container Registry URL – here we set “‘eu.gcr.io” which is for images hosted in the European Union.
- The Docker image name uses the registry URL as a prefix and, in this case, resolves to “eu.gcr.io/acme-555555/backend” (the middle part of the path is the Google customer name and customer ID).
steps:
    - name: Checkout working branch
      uses: actions/checkout@v1
    - name: Set Docker Registry
      run: echo ::set-env name=DOCKER_REGISTRY::eu.gcr.io
    - name: Set Docker Image
      run: echo ::set-env name=DOCKER_IMAGE::${{ env.DOCKER_REGISTRY }}/acme-555555/backend
Code language: PHP (php)
2) Log in to the Google Container Registry, then build and Push the image
For this task, we use two user-contributed actions to log in to the container registry and push the Docker image to the registry. GitHub’s virtual machines include a lot of pre-installed software, such as the Google Cloud SDK — which our “login” and “push” actions use.
To log in to Google Cloud, we use another secret — “‘secrets.GCLOUD_KEY”, which is the service account key for our Google Cloud project. Again, this secret is defined in the repository settings.
When the login step completes, the GitHub action outputs the username and password for the container registry — which we then use in the “build and push” step.
- name: Login to gcloud registry
      id: gcloud
      uses: elgohr/[email protected]
      with:
        account_key: ${{ secrets.GCLOUD_KEY }}

    - name: Publish Docker Image
      uses: elgohr/[email protected]
      env:
        SSH_PRIVATE_KEY: ${{ secrets.SSH_PRIVATE_KEY }}
      with:
        name: ${{ env.DOCKER_IMAGE }}
        username: ${{ steps.gcloud.outputs.username }}
        password: ${{ steps.gcloud.outputs.password }}
        registry: ${{ env.DOCKER_REGISTRY }}
        buildargs: SSH_PRIVATE_KEY
- The secret “secrets.SSH_PRIVATE_KEY” is our machine user’s SSH key, which is then passed in as a build argument for the Docker image. This enables the container to perform operations that need SSH credentials, such as cloning private git repositories (which we need to do for a couple of our dependencies).
- The username and password arguments come from the previous step using the outputs mechanism.
By default, the “publish” action tags the Docker image name of the branch.
Each branch is prefixed with a JIRA ticket number so that JIRA can automatically detect it and link it to the ticket. In the Docker registry, our images look something like this:
Name: 8cd6851d850b Tag: XYZ-123_add_special_field_todo_magic
I mention this only because the action provides other ways to tag the image. In my article about our deployment workflow, I’ll show you a different method.
And that is the end of the workflow. If you want to see the workflow file in its entirety, check out this gist.
A note about container storage
One day in the distant future, our container registry is going to get quite large.
If we’re storing a 333MB image on every push, we could reach up to 1GB after three pushes. A 1GB of container storage costs $0.026 every month, so it’s not exactly going to break the bank. Nevertheless, if you’re using another container registry, you might want to manage your storage capacity and clean up older images.
Luckily there are scripts out there to do this, such as this one.
Summary
As you can see, workflows are pretty easy to set up. Plus they don’t cost anything extra. We have a GitHub Enterprise license, but they’re also available for all other plans. Just be aware that there are limitations on the number of minutes that actions can consume, and these limits differ according to your GitHub license.
Obviously, your repositories have to be in GitHub, and while local testing is convoluted, you can do is use your own virtual machine to run specific jobs.
For future projects, we’ll probably stick with GitHub CI/CD workflows since we found that they were easier to use than other tools such as Jenkins or Travis.
If you found this walkthrough useful, check out my companion article about our deployment workflow.